Before I started at phData, I was a one-stop Alteryx shop: product owner, training and enablement, licensing, and server administration. It was a blast having Alteryx as such a key component of my day-to-day, but it wasn’t my only responsibility. The rest of my team and I were also doing all of that for a massive Tableau Server environment.
Requests for support, information, and data sets were constantly hitting our inboxes, often at a rate that was tough to keep up with. A lot of these requests were for similar asks. Who has access to my Tableau project? Which users are looking at my reports? Is anyone running my shared workflows? We couldn’t give users access to the entire repository for security reasons, so I would create data sources that only filtered to projects applicable to the requester. Requests became so frequent that I took it to Alteryx to automate.
It started as a workflow that I could swap filters in and out for to meet the requester’s needs. This was better, but required finessing. It still took time out of my day to gather requirements, run the workflow, and send another email with instructions to the user. Why not skip all of that AND save room in my inbox? That’s why I started creating analytic apps for users to self-serve their requests.
Enter: Interface tools and analytic apps.
What is an Analytic App?
An Analytic App is a type of workflow in Alteryx. Using Interface Tools, you can build a full UI for your workflow, allowing users’ input to what is happening for your data. In the case I just discussed, that input was most often the name of a Tableau Project or workflow on Alteryx Server. This would result in an end product (either a spreadsheet or data source pushed to Tableau Server) tailored to their specific request.
Here’s the best part: when Analytic Apps are published to Alteryx Server, users without Designer licenses can run them with their own input. This means that instead of having users ask you to run a report for them, they can do it themselves!

Turning a Workflow to an Analytic App
Let’s walk through how to turn a workflow into an analytic app, using Superstore data as an example.
Below I have a basic workflow that filters order data by a category, then outputs selected fields to a csv. I want my users to be able to choose the category, fields selected, and name the output csv.

Step 1: Category Drop Down
Let’s start with selecting a category. Opening my designer to the Interface palette, I’m dragging a Drop Down tool onto my canvas. You’ll notice that dragging an Interface tool onto the canvas automatically turns the workflow type from standard to an Analytic App.
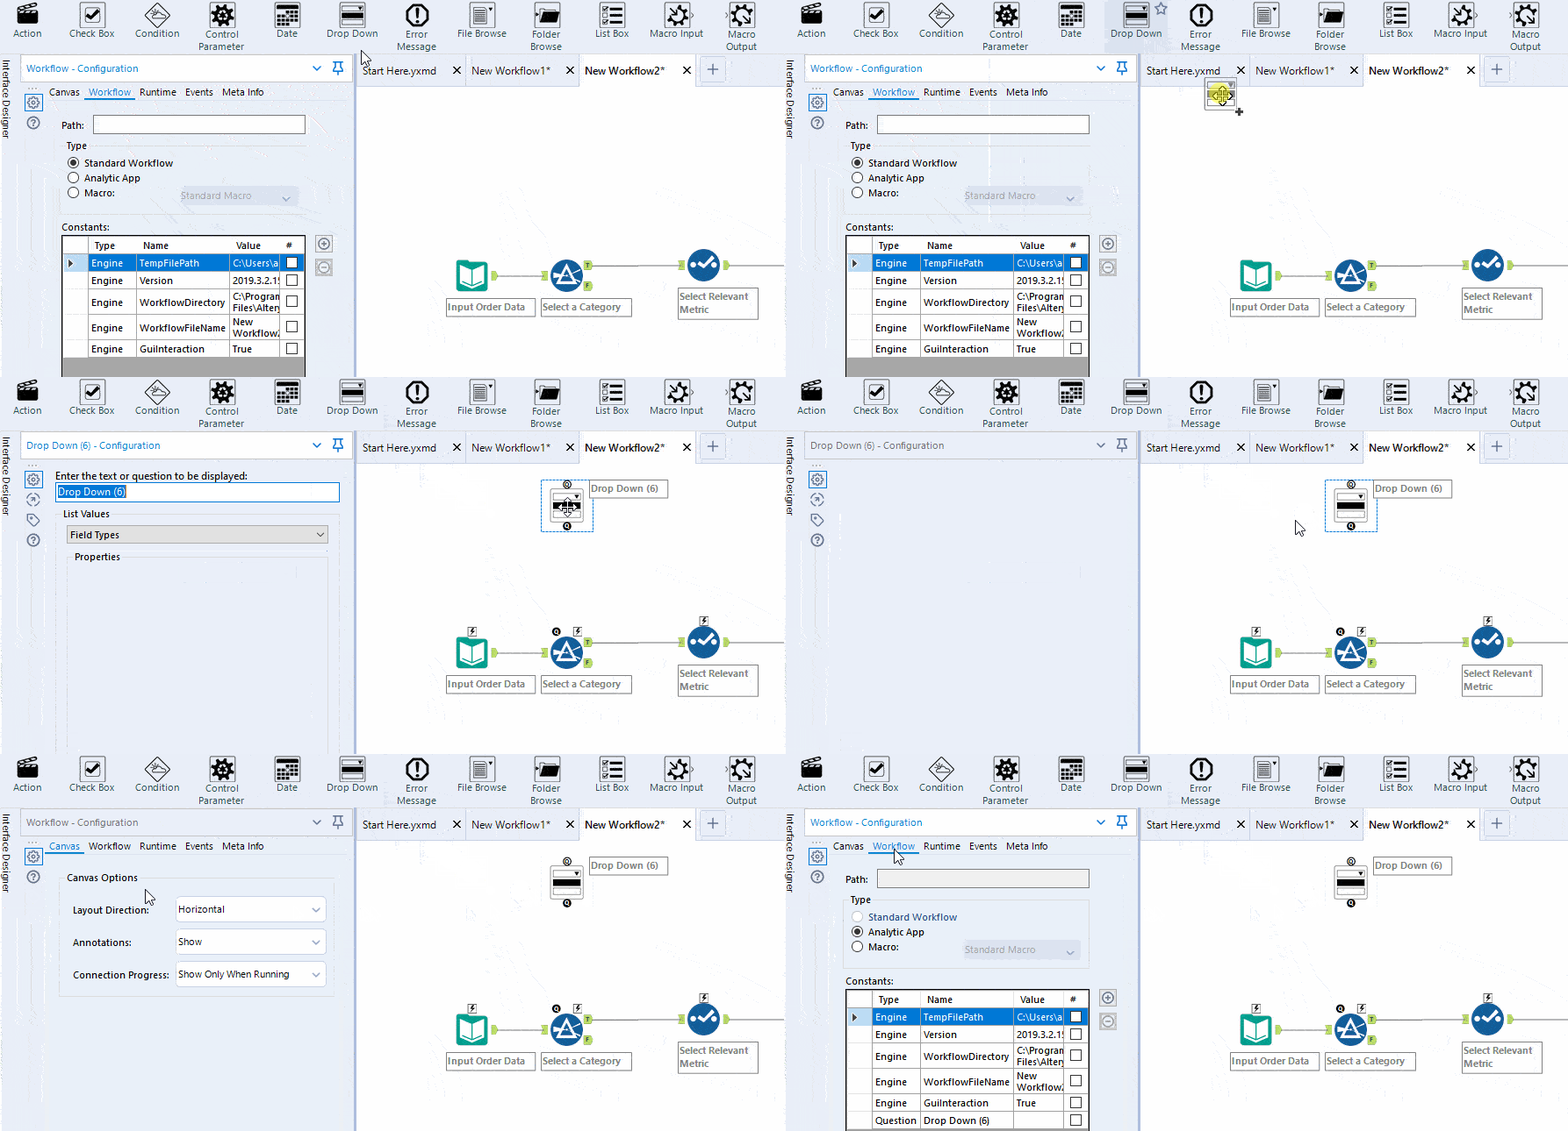
Now I’m going to configure that tool to show the values of our three categories. Below, you’ll see that I’ve chosen to manually set the possible category values, and I’ve added some user-friendly text to the drop down.

The resulting drop down looks like this when run with as an analytic app in designer:
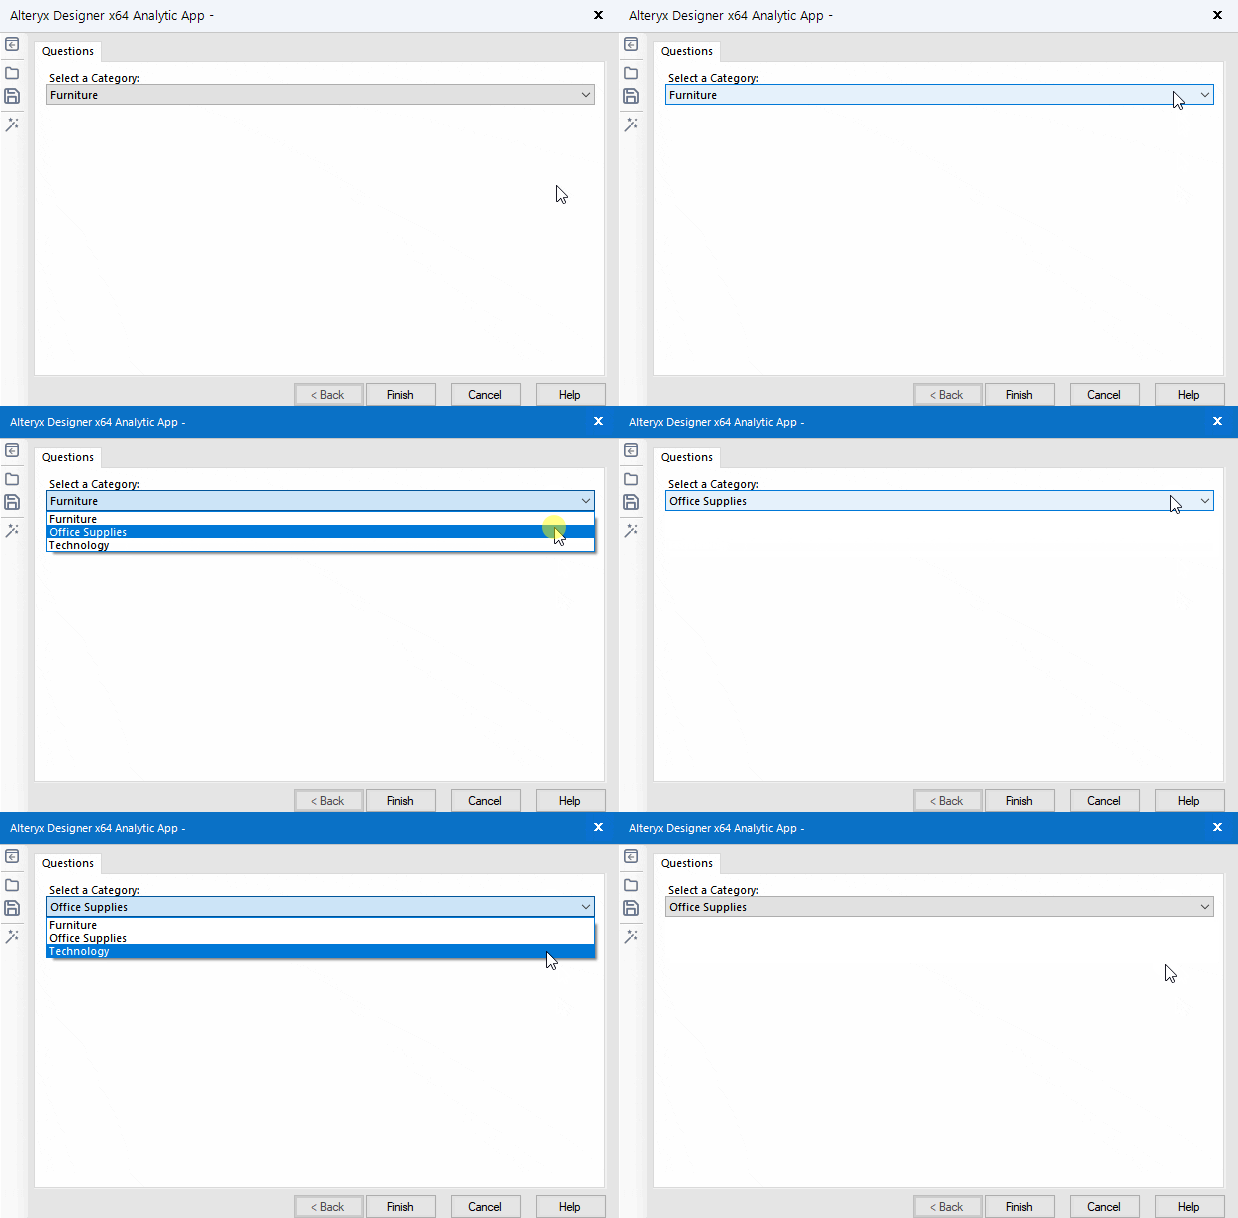
However, this doesn’t do anything yet. We need to use an action to connect the interface tool to our filter tool.
To do that, I’m dragging the Drop Down tool’s output anchor to the action anchor (lightening bolt) of my filter tool. This will automatically produce an Action tool that we can configure to update the filter logic.
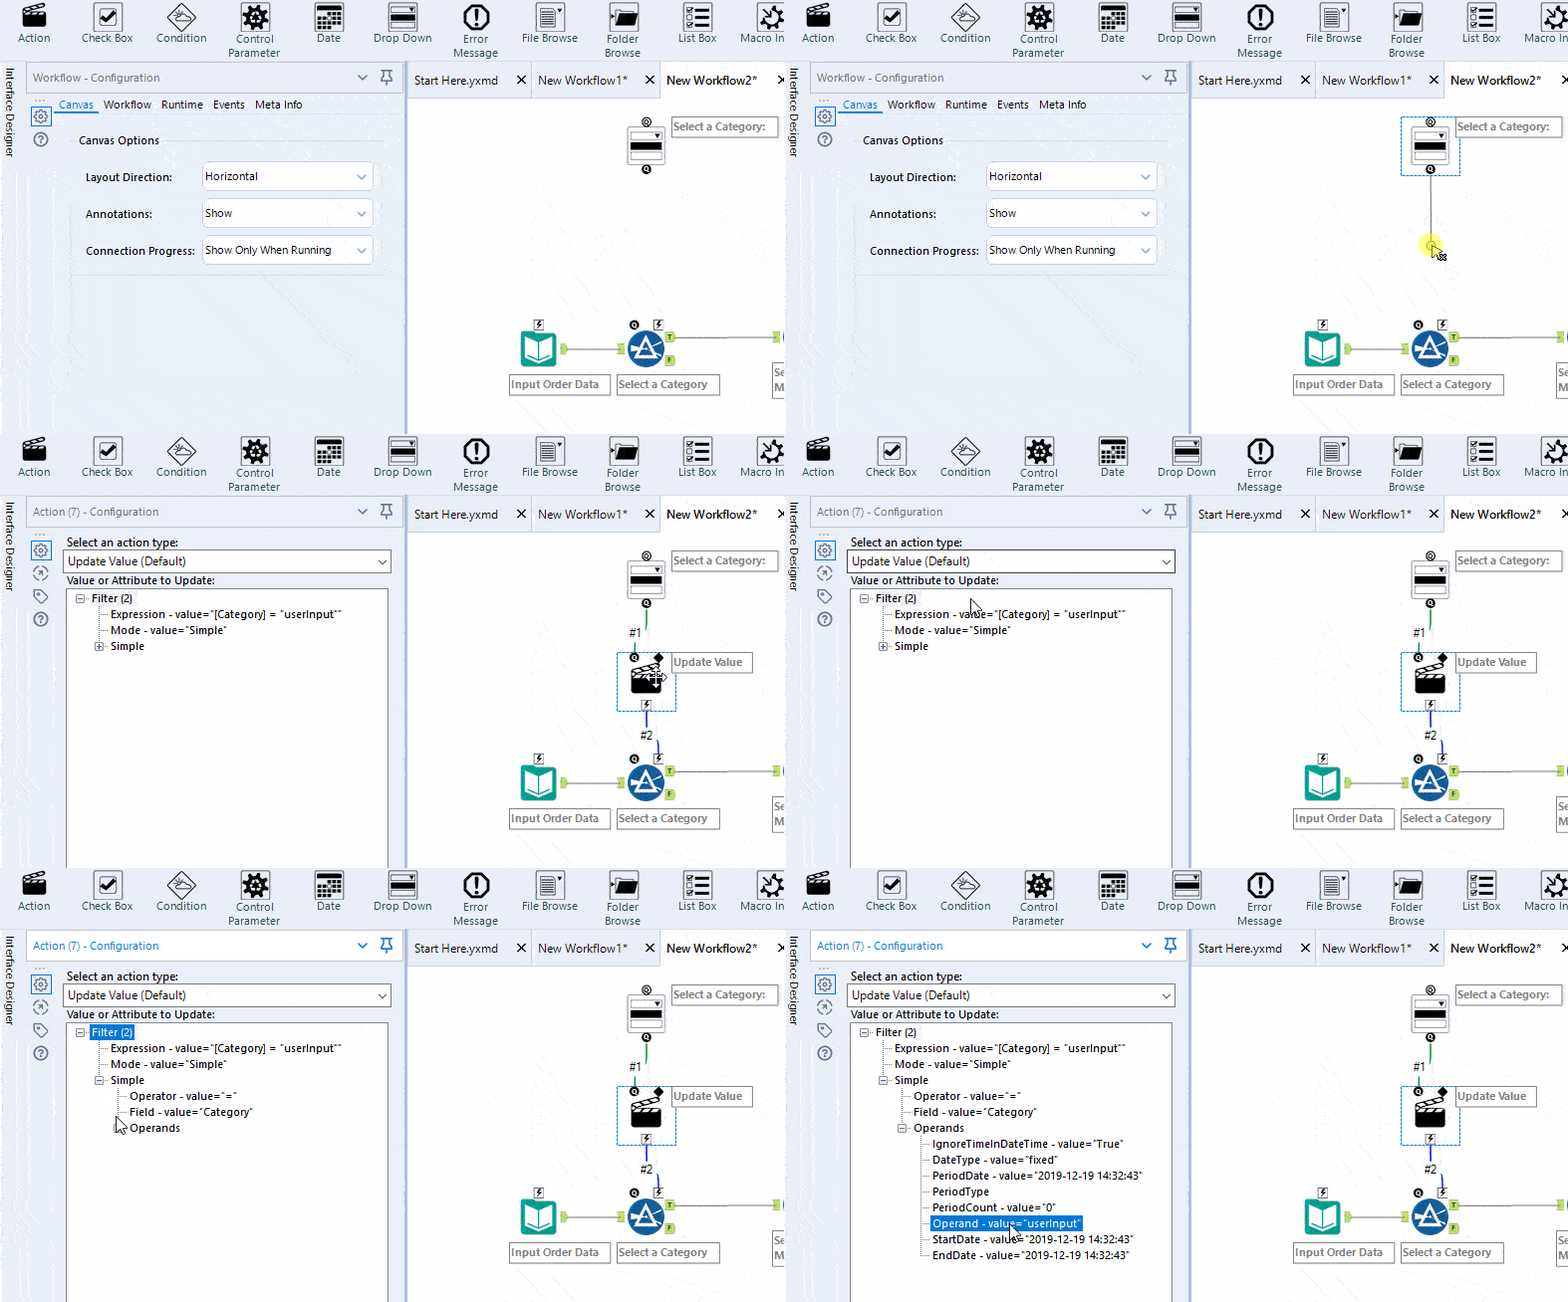
As you can see above, configuring this action tool is as simple as keeping “Update Value” and selecting the value to be updated with the value in the drop down. In this case, I’ve pre-populated the filter tool with “userInput”, and am selecting that value to replace.
Step 2: Select List Box
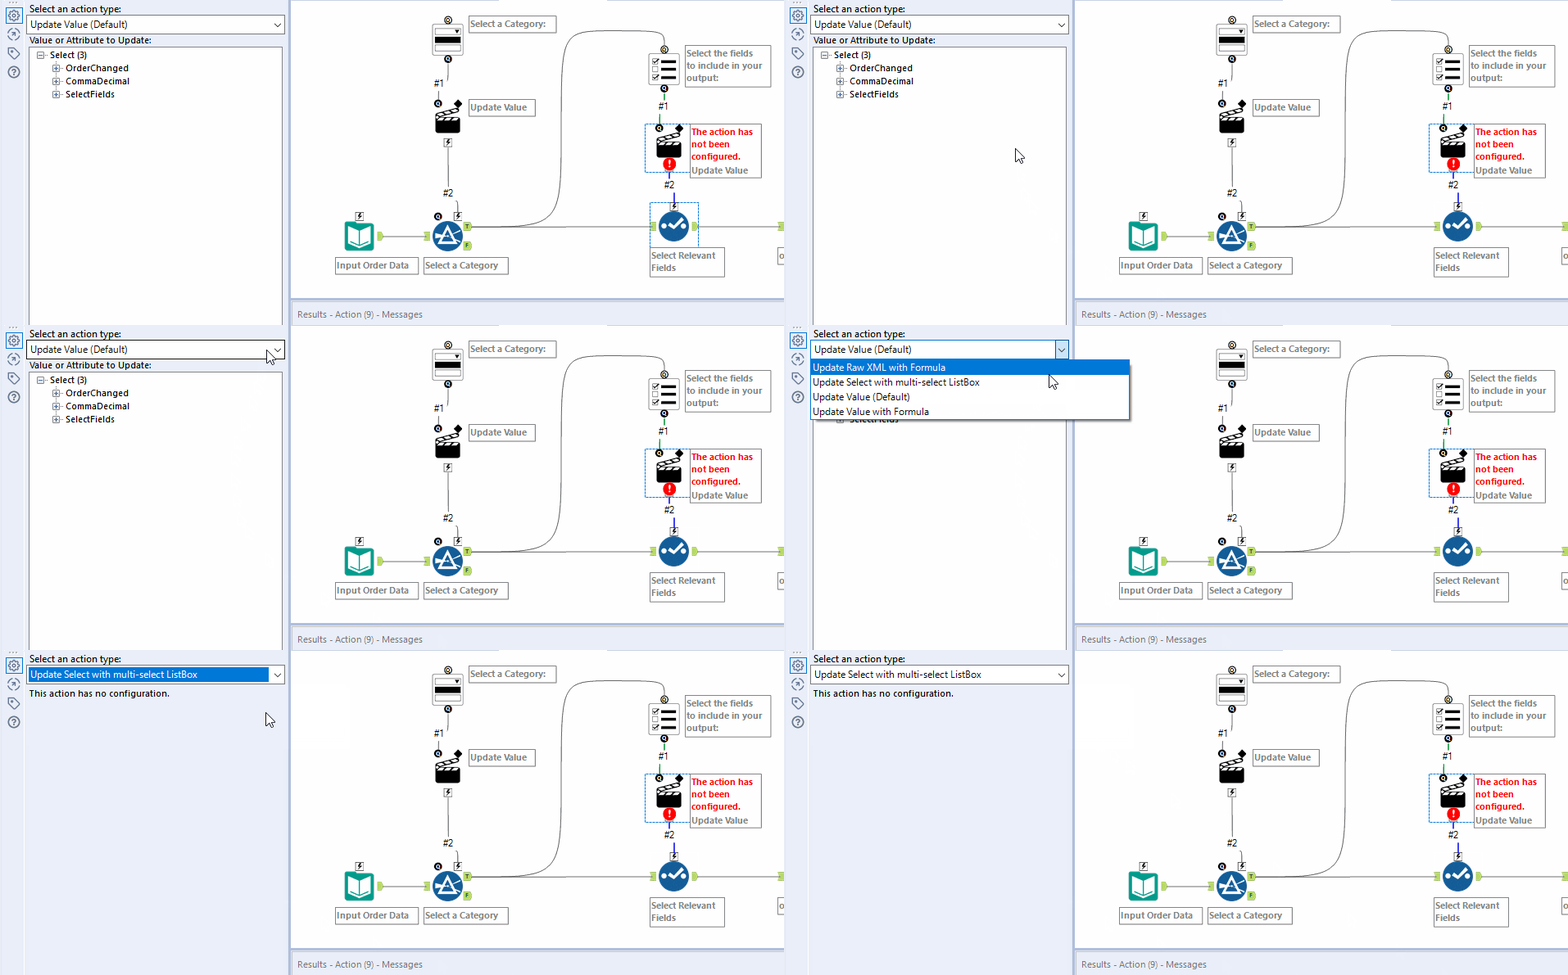
Now let’s talk List Boxes. Here, I want to allow my users to select fields that should end up in their output file. To populate this List Box, I’m going to need those fields input. To do that, I’m going to drag the output of a tool with the fields on want (in this case, any before the select will do) and connect that to the List Box’s optional input. Doing this will automatically set the configuration to “Select Tool Mode” and input the field values from the connected tool.
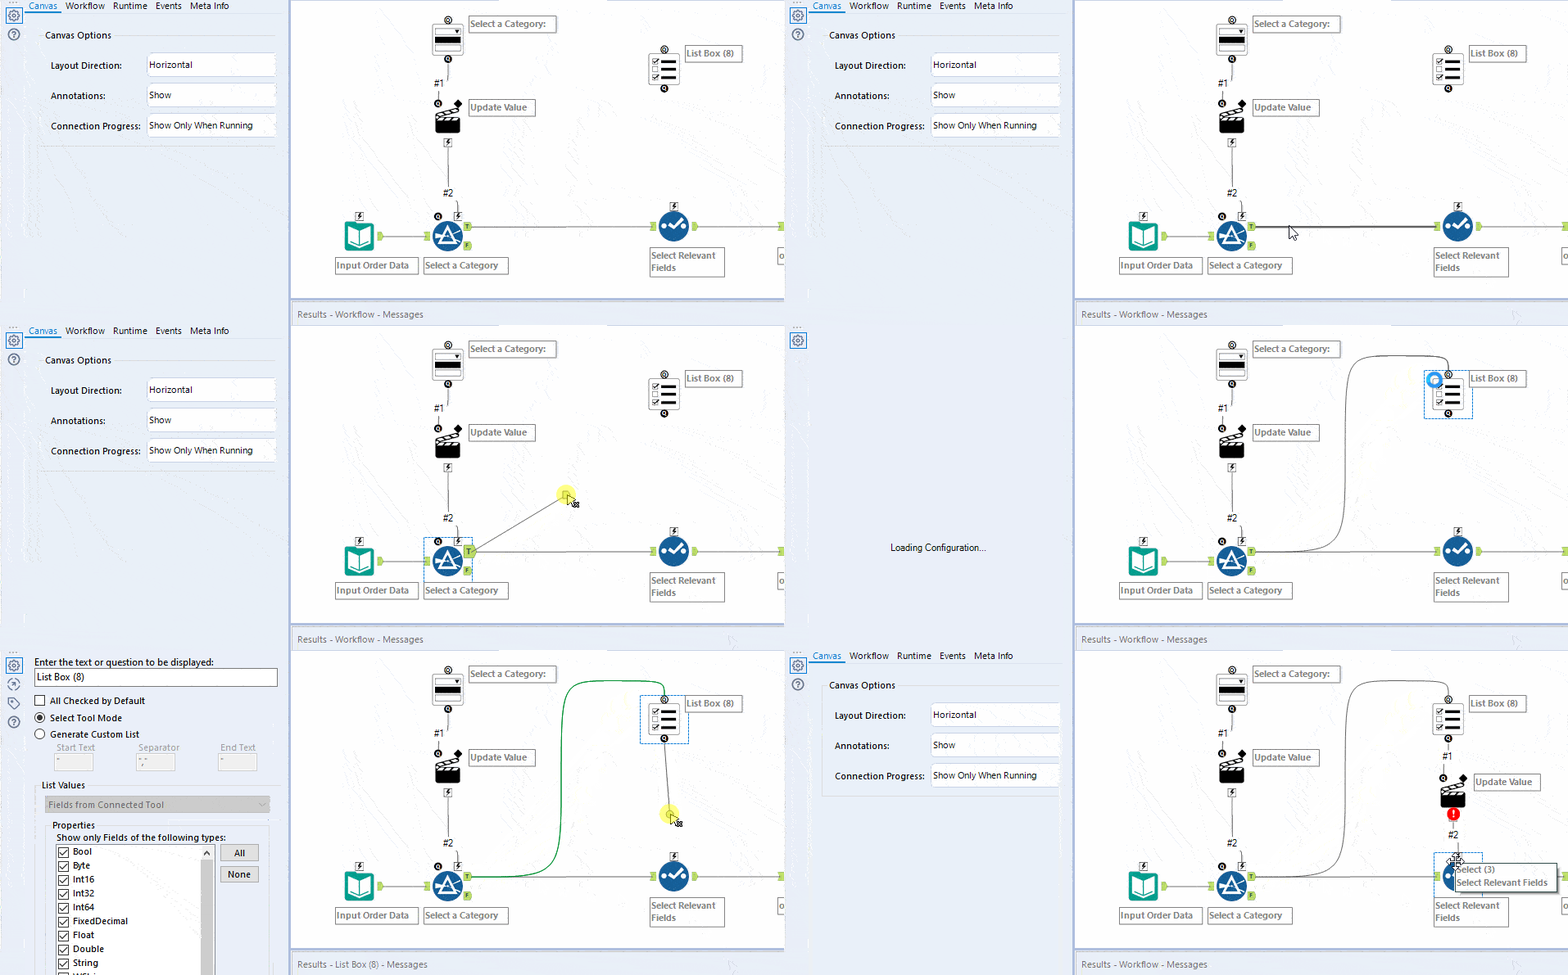
I’ve also connected the output anchor of the list box to the Select tool, creating another Action tool just like we did with the drop down. Now it’s time to configure our action!
Change the configuration of the Action from “Update Value” to “Update Select with multi-select ListBox”. Boom – that’s it. Your List Box will now update what is selected within the Select tool.
Step 3: File Name Text Box
Now, let’s drag our final interface tool, a Text Box, and connect it to the Output tool to create our Action.
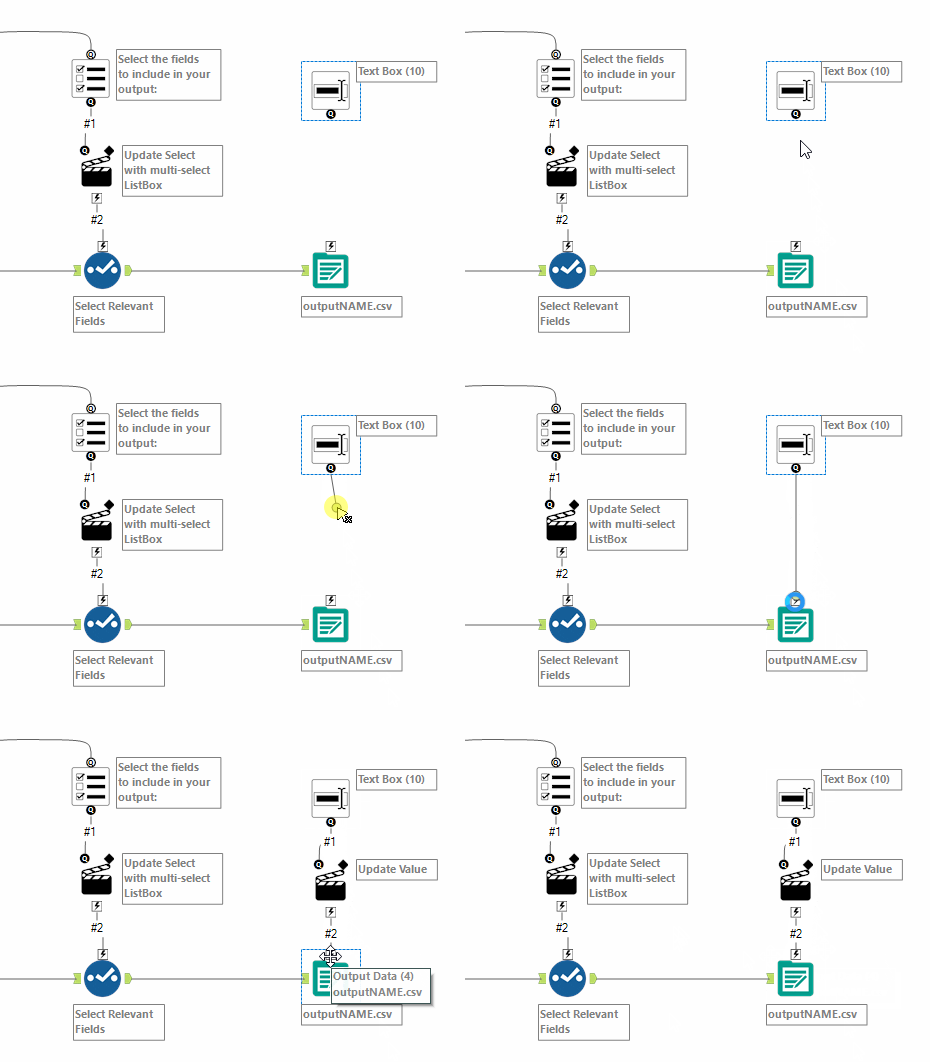
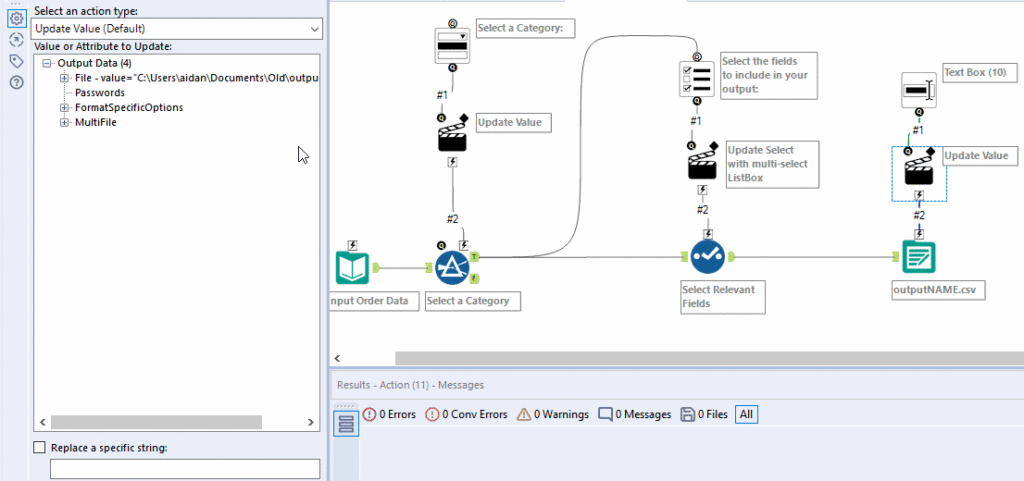
We’re going to configure our action similarly to how we did with out drop down, with an Update Value. The field that we want to update is the file value, but in this case we only want to update a specific string, rather than the entire path and file extension. Below, I’m selecting “Replace a specific string” and typing “outputNAME”, which is the default name of the output file.
Below, I’m selecting “Replace a specific string” and typing “outputNAME”, which is the default name of the output file. With this configuration, only outputNAME will be replaced, rather than the entire string.
Step 4: Clean it up!
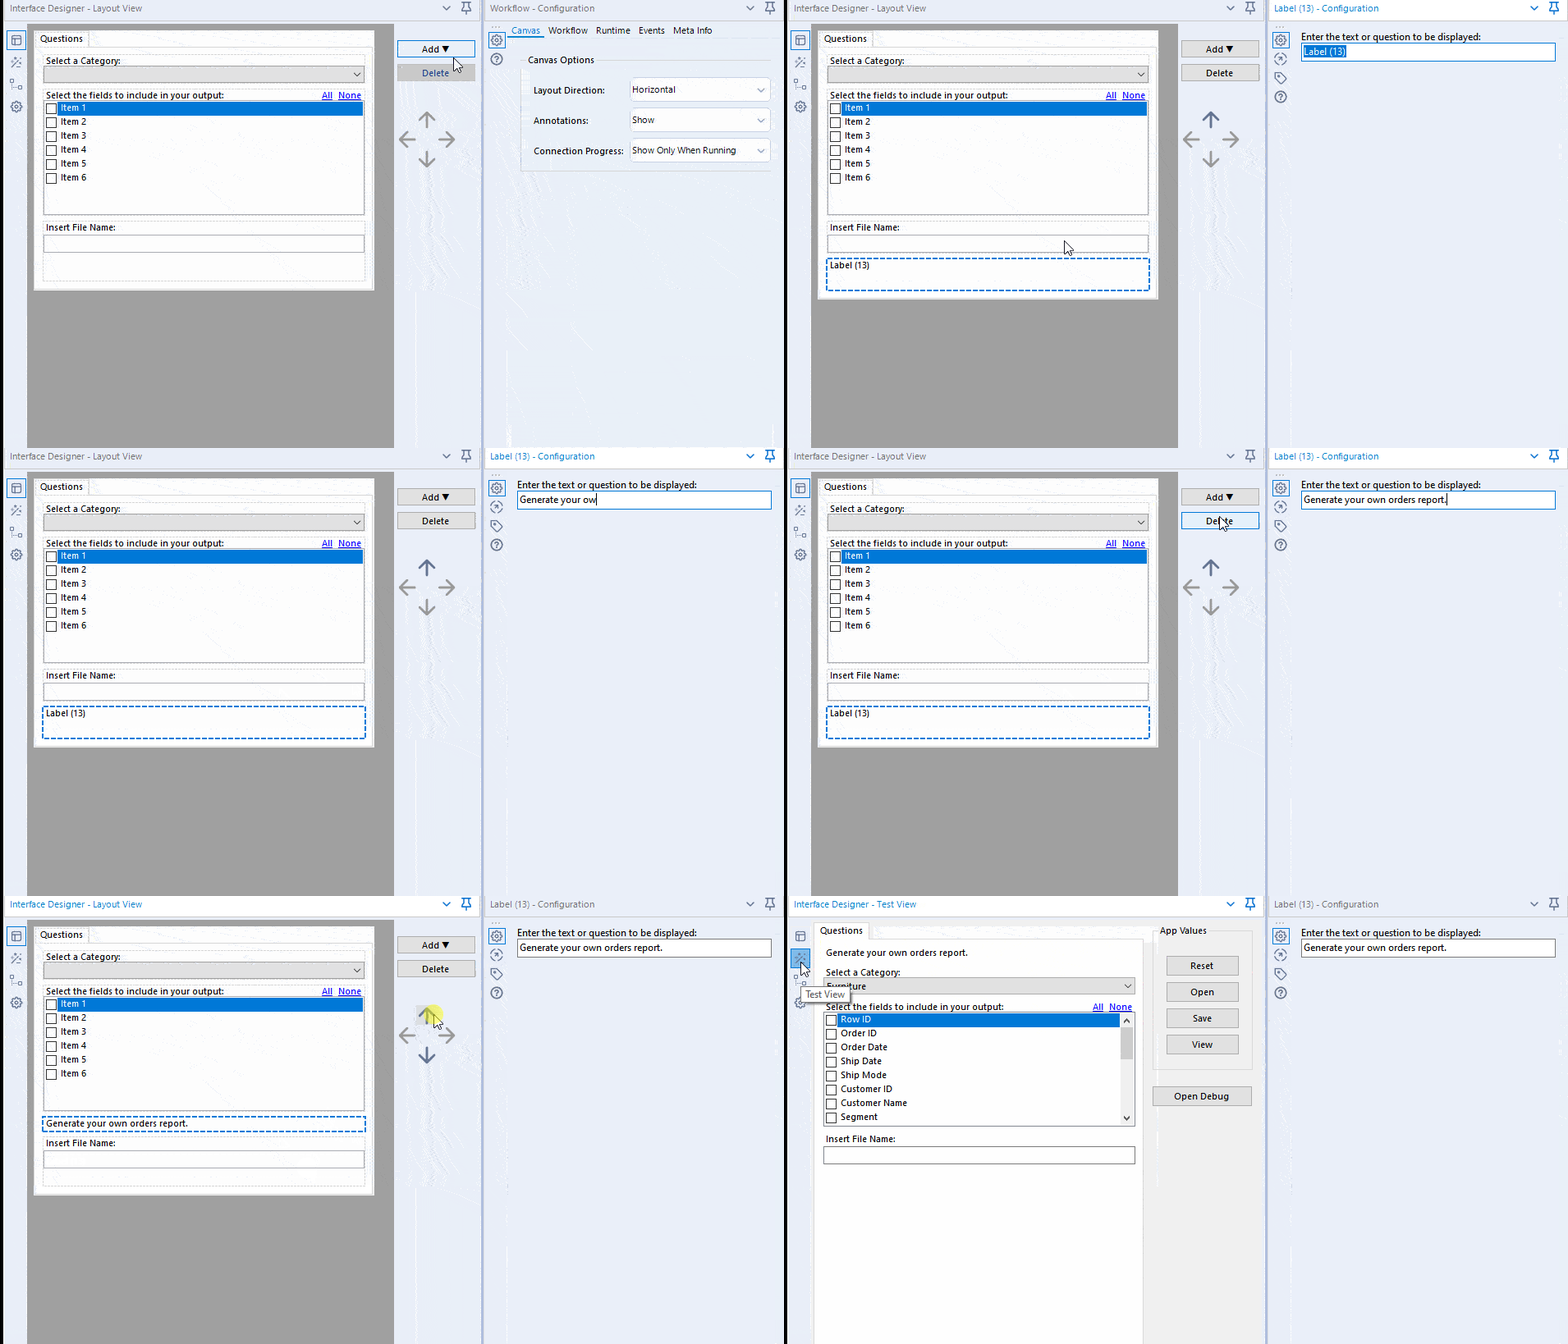
Now let’s use the Interface Designer to make sure our UI is looking nice.
If you’ve never used the interface designer before, you can enable it in View > Interface Designer.
Below, I’m creating a label instructing users of the purpose of the app by clicking Add > Label. I’m then moving the label to the top of the interface.
Step 5: Profit
You now have a workflow that can be customized to the needs of your users. When published to Alteryx Server, users will run this workflow and experience the same drop downs, text boxes, and list boxes as shown in Designer. And they won’t even need a license!
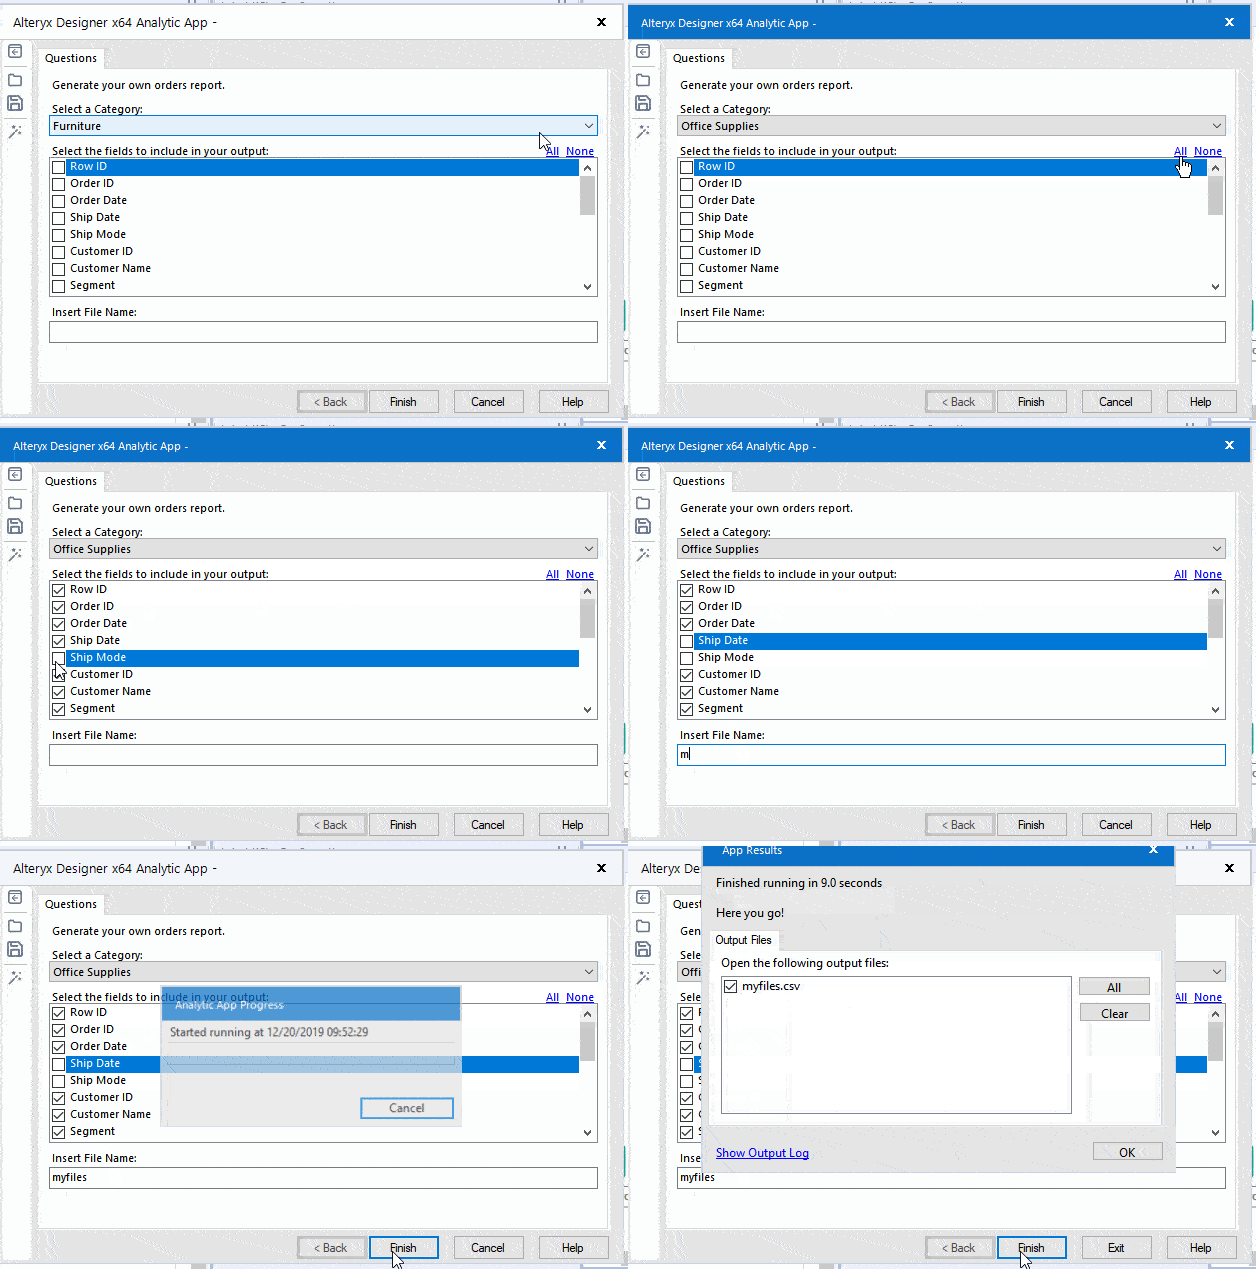
The example we just walked through was simple, but the ideas demonstrated can be easily transferred to any use case. Whether you’re attempting to make user support more self-serve or looking to automate a commonly requested report, Interface tools and analytic apps can be a huge time saver.
Do you have more questions about Alteryx? Talk to our expert consultants today and have all your questions answered!


